Custom Property Sets / Adding fields to a Custom Property Set
Add fields to a new or existing property set, or update drop down menu selections, lookup field information.
- Select the Control Panel tab.
- Click Custom Properties.
- Select the relevant custom property set
- Click Fields located in the left side menu
Note
Select the Custom Property Set you want to work with before selecting the following items from the menu.
When creating fields be mindful of what information will be entered as changes to field names, types, lengths, mandatory fields, field sizes can only be done via the SQL Database.
Add fields to the custom property set
Once Fields have been created, the fields themselves cannot be Edited. The only changes permitted are to the Options for relevant fields and the order that the fields are displayed.
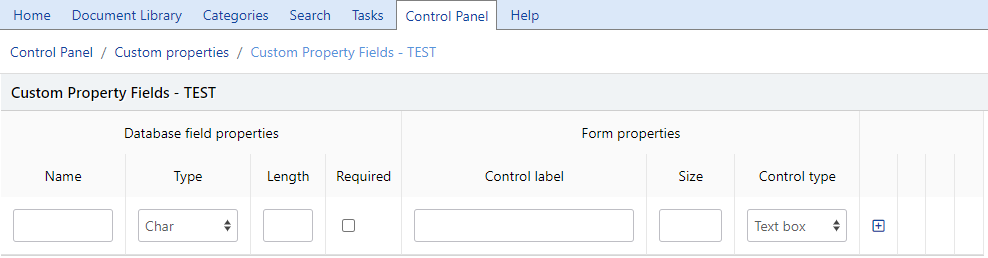
Name
Enter a meaningful name for the field, avoid special characters and replace spaces with underscores as this is used by the SQL Database
Type
Selects a field type of:
- Char - select if the field will contain characters or numbers
- Number - select if the field will contain numbers only
- Date - select if the field will allow for date selection
- Boolean - select to display a check box
Length
Enter the maximum number of characters this field will contain.
Note
the field length cannot be changed through MAGIQ Documents front end after creating the field, so think carefully about the infromation to be captured using this field
Required
Place a check in this box if you would like this to be a mandatory field.
Control Label
This is the field name the user will see.
Size
Enter number of characters that are visible when entering text into a field, generally this will be the same as length field.
Control Type
Is the field type
- Text Box - allows standard text input.
- Combo Box - This field will be a drop-down box to include a set of pre-defined values that the user can pick from. It prevents free form entry.
- list Box - a set of pre-defined values that the user can pick from. It prevents free form entry.
- Radio Button - users can set value to "On" or "Off". Multiple buttons can be displayed
- Check Box - field appears as a check box. Type must = Boolean - only a sinlge check box is displayed.
- Lookup field - allows for data to be extracted/added to database tables.
Please check with a MAGIQ Documents staff member before using.
Note
To add Options to combo boxes, list boxes and radio buttons or update lookup files, click "Options"  to define the options that will be made available.
- Click
 to add the field.
 - Clicking
 deletes the field.
 -
Clicking
 moves the field to where you want it to reside.
Note
Any data that has been collected using a field that is deleted is un-recoverable.
Be very careful - further IT input and involvement is highly recommended at this stage of making a final decision.
-
Repeat the process until all fields are defined.
Note
Once fields have been created, the fields themselves cannot be edited. The only changes permitted are to the 'options' for relevant fields and the order tht the fields are displayed.
Creating lookup fields
- Click fields located in sidebar menu
- A field with the control type of "lookup" must be added
- Notice that an options icon will appear to the right of the newly added field.
- Click the for the lookup field.
- The Database Connection Parameters screen will appear.
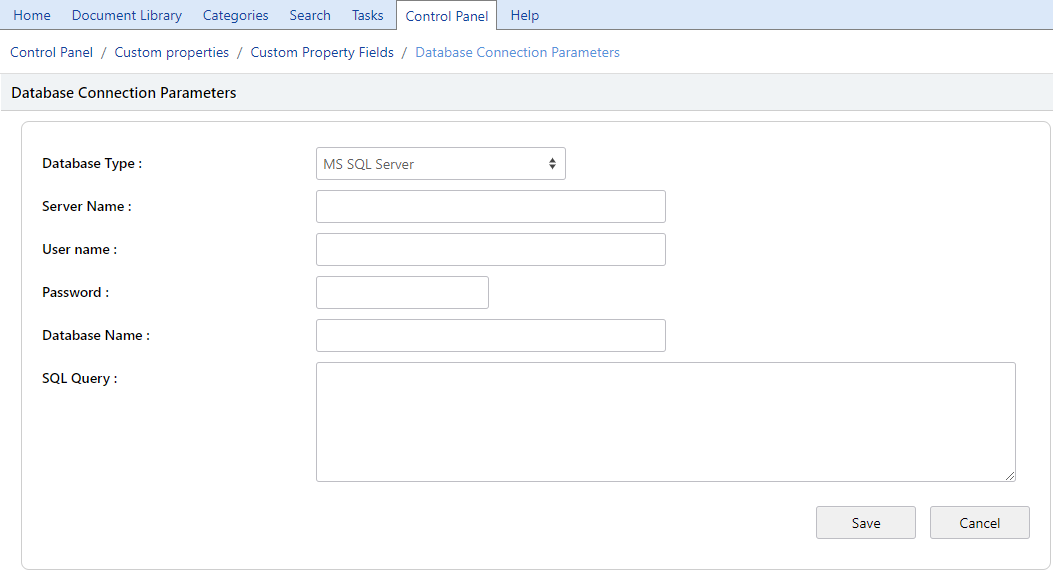
- Database Type - select from MS SQL Server, Oracle or MySQL
- Server name - Enter the server name to where the data is that you are wanting to lookup
- User name - Enter the databse user name
- Password - Enter the users password
-
Database Name - enter
-
Choose database type and fill
- The second section is where you will enter your SQL Select Statement.
- Enter the SQL Select
Let's assume that the lookup field is called "City" and you wish to load the city names from a database table so the user can simply select from a list instead of typing the city name.
Here is an example of how your select statement would look like:
SELECT CITY FROM CITIES
If your table (CITIES) column names are different than the field names for your custom properties, then a SQL Statement like the following would be appropriate:
SELECT CITYNAME AS 'CITY' FROM CITIES
In short, the column name returned by the query must match the custom property field name.
- Click on the Save button to save your sql statement and database connection parameters.
- You will now be prompted to execute the query.
- If you get rows to appear in this window from your database table, this will mean that your lookup field has been configured correctly.
Passing values to other custom property fields
If you would like to return multiple fields from your query, then your select statement would like like the following:
SELECT CITY, STATE, ZIP FROM CSZ
If your custom property set has fields named exactly the same, selecting a row will automatically populate these three fields.
Passing values to the SQL Statement
If you would like the user to be able to type in a partial entry in the lookup field to get all matching rows, then your select statement would look like the following:
SELECT CITY, STATE, ZIP FROM CSZ WHERE CITY LIKE '<%=VALUE%>%'
With the above statement, the user can enter a partial value such as "a" to get all rows where the city starts with the letter "a". In other words, the phrase '<%=VALUE%>%' will be replaced with what the user enters as a partial value.