Uploading Documents to MAGIQ Documents
To upload/register or save an existing document:
- Locate the MAGIQ Documents folder where the document is to be stored.
- Select New menu > Upload
-
Enter relevant fields - see below
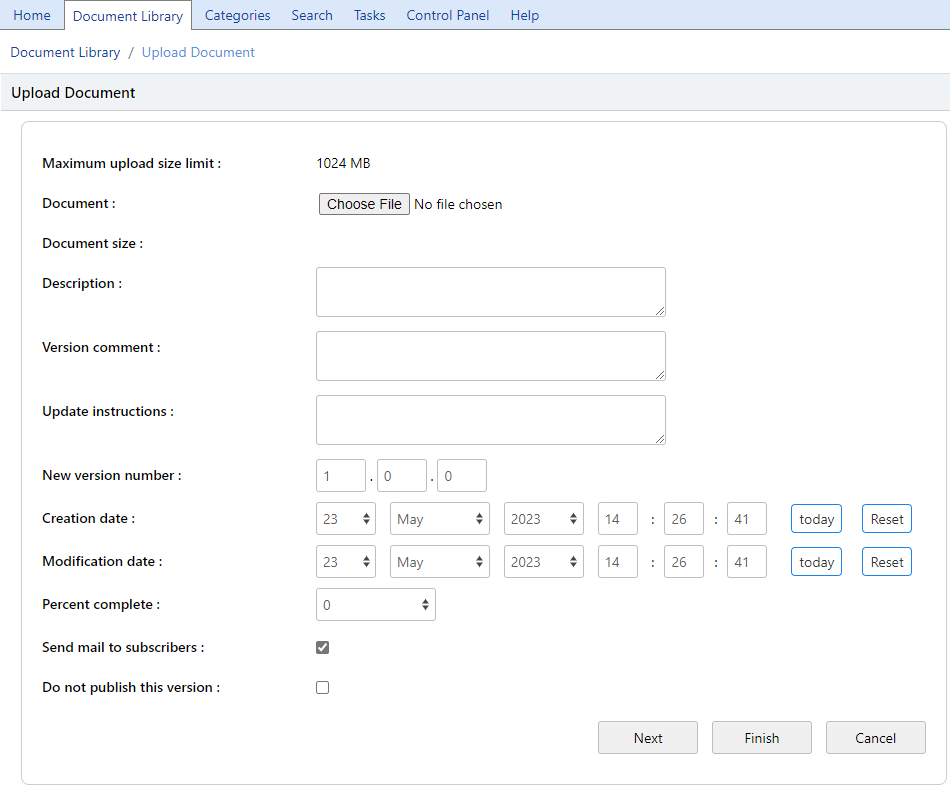
Document
Click Choose File to browse/locate the document you wish to store. Press Open once the document has been selected.
Description
Enter a short description that describes the contents of this document.
Version Comment
(optional) Enter version comment ie. Why this version is being created.
Update Instructions
Enter Update instructions. This information is included in the email notification that goes out to subscribers of the change notification (optional).
New Version Number
System generated - Can be altered if required.
Creation Date
Will default to Today's date - Can be changed if required.
Modification Date
Will default to Today's date - Can be changed if required.
Percentage Complete
If you have completed the document and you do not want any more editing to occur select 100, otherwise leave this blank or select a percentage to reflect the status of your document.
Note
Marking a document as complete will disallow further edits to this document until the completion date is reset or the percent complete information is set to something other than 100% (optional).
For more information on this topic refer to completing documents
Send mail to subscribers
Sends an Email advice to Subscribers. Untick if you do not wish for this to happen
Do not publish this version
Check box is ticked by default if the library policy of 'Document Type must be set' has been set.
If this library policy has Not been set, the checkbox is unchecked, and the document will be published after selecting a document type on the next screen.
If you DO NOT proceed to the Next screen, ie. you select Finish, this document will have a document type of Generic and will be unpublished.
If you do not wish to publish this document, tick this checkbox. The document will appear in grey meaning it is not approved for general release.
- Click Next to upload your document. DO NOT select Finish
Note
You may also be prompted to fill out information for a custom property. This is called "Automatic Custom Property Prompt". This is a feature that is activated at the folder level.
For more on this topic refer to Folder Prompts.
- Select a Document Type from the drop-down list.
Depending on the type of document selected you may be required to complete some Custom Properties, if so, these will appear below the drop-down list.
Note
Do not use Generic as this does not save any metadata with it.
- Enter the required Custom Properties.
- Click Next to set security.
- By default, the security is inherited from the folder.
Note
To change the Security Settings on this document
- Click Remove Inheritance,
- Click Close to complete the upload without displaying the Document properties screen,
- Click Next to send the document to a workflow
- Choose the appropriate Workflow
At the completion either choose Next to display the Document properties screen or
Close to complete the upload without displaying the document properties screen - If the document properties screen is displayed, you may assign security, add keywords, subscribers etc.
Once the document is created, the document properties screen will appear. In this window, you may assign security, add keywords, subscribe others etc.
You may also be prompted to fill out information for a custom property. This is called Automatic Custom Property Prompt. This is a feature that is activated at the folder level.
Security considerations
In order to be able to create documents, you must have at least "ADD" rights in the folder in which the document is to be created.
An important thing to remember is that the new document (by default) will inherit the security permissions from the folder in which it is created.
So if you would like to change or assign a different security, you must go to the security screen in the properties window.
For more on this topic refer to Document Security.