EasyForms / Administration
The easyforms administrator has the ability to configure the operation EasyForms.
Note
If users are editing the contents of an EasyForms document. Check in and Check outs must be allowed in the folder rule and through the library policy.
Administrator Allocation
An EasyForms administrator is determined by adding a username to the web.config file.
To add an additional administrator
- The web.config file is stored on your MAGIQ server in \\MAGIQ\Documents\Services\EasyForms.
- Open the file with notepad or an appropriate editor.
- Scroll down the file looking for the section called
<appSettings> - In the line
<add key="AdministratorAccounts" value="sysadmin,dale">additional users can be added after value=" within the quotation marks, placing a comma between each addition. - Save and Close the web.config file then restart EasyForms.
Loading a template into MAGIQ Document for EasyForms usage
An HTML template needs to be loaded into MAGIQ Documents before it can be used within EasyForms.
To Load a form into MAGIQ Documents
- Within MAQIQ Documents, under the Form Templates library, create a folder called EasyForm Templates
- Upload your HTML form into the EasyForm Templates folder by:
- Highlight EasyForms Templates folder.
- Click New - Upload
- Navigate to where the form template is saved.
- Click Finish.
Note
If a template has been deleted, and a user tries to edit a document that was based on that template, they are unable to because the “connection” has been lost.
Configuring Form Template Preferences
Now that the form is loaded into MAGIQ Documents, it is now ready to be configured for EasyForms.
-
Click

Any templates that have been added will be listed here.

Manage Categories to create a new grouping on the home screen.
Add New Templates to add new templates.
Sorting Columns - Clicking the column name will sort the column in ascending or descending order.
Action Column -  Removes the form from the selection list.
Manage Categories
Creating categories allows for grouping of similar templates.
- To Create a Category
- Click Manage Categories.
- Select

- Enter the category name.
- Click
 to add / save
Add New Template
This determines which template is to be used, how the document is to be named, where to save the document, and what document description should be recorded at time of saving.
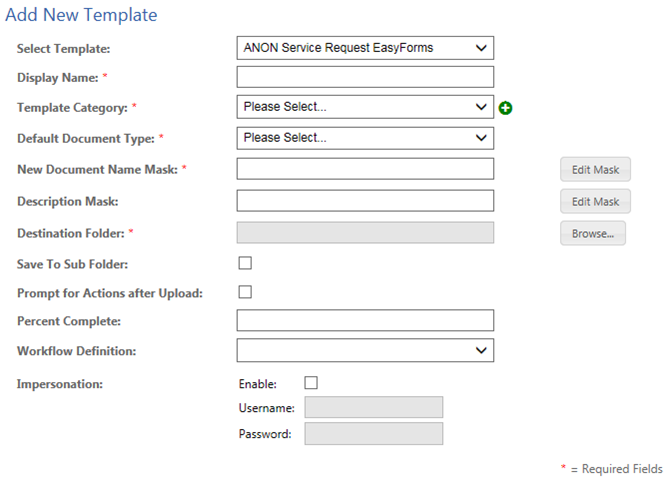
Select Template – Choose which template to base your form on.
Display Name - this is the name that will appear in the Template selection list.
Template Category – Select the relevant category from the drop down listing.
allows for creation of a category. On Save, the category will be created and applied to the template.
Default Document Type - ability to select what document type will be assigned to the completed form / document.
New Document Name Mask - sets the naming convention when saving the document.
Note
A document name must be unique. Otherwise the same document is overwritten. For example, include the document id or a date.
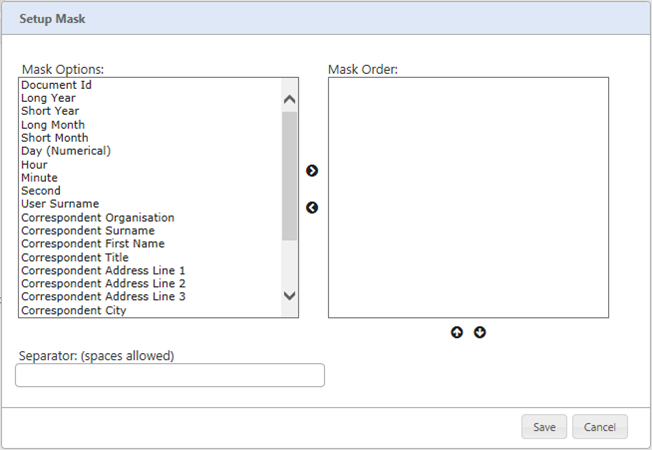
To create your naming convention
- Click Edit Mask.
- Choose your Mask Option, click
 to place in the Mask Order section.
 - Continue until you have the desired document name.
- Use the
 to change the order.
 - A separator can be used (optional).
Special characters cannot be used (just the same as saving a "normal" document into MAGIQ Documents.
Description Mask - sets what information you want recorded into the document description within the document properties.
Description mask option of Input selection will provide the description as entered by the user into the form. Providing that option has been added onto the html form.
Destination Folder - determines which folder the document will be saved / registered to.
-
Click Browse
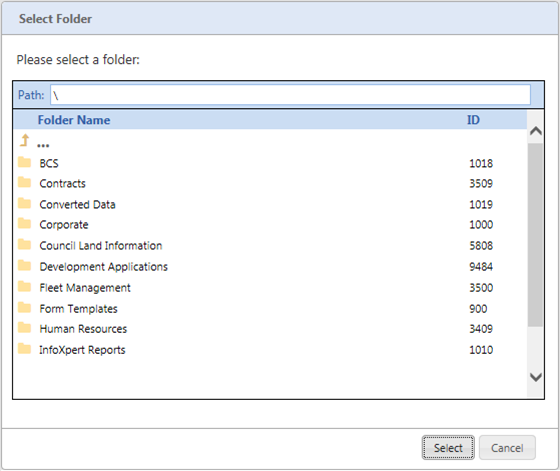
-
Click the library and folders where you want the document registered to.
- Click Select
Save to Subfolder - Check this box if you would like the user to select a folder below your selected destination library or folder
Prompt for Actions after Upload - Check this box to provide users with the ability to perform additional actions for the completed document after submission.
The additional actions include Generate Auto Reply Letter, Send to Document Navigator, Assign to Workflow, View Document Properties, View Document Comments,
View Document Associations.
Percentage Complete - sets the percentage complete on all documents registered.
Workflow Definition - applies the same workflow to all documents registered.
All workflows are applicable to the destination library or folder nominated above.
Alternatively, leave the workflow definition as please select... and allow the user to choose a workflow. Prompt for actions after upload must be ticked for this option to work
Impersonation - ability to cater for public, anonymous or non-authenticated users to utilize EasyForms. For example, a rate payer can create a document, and it will be registered into the system using the username and password supplied.
Note
When enabling impersonation the option to Prompt for Actions after Upload will be unavailable and become greyed out.
- Tick Enabled.
- Enter an MAGIQ Documents username and password that those users will impersonate.
Save – will save all changes.
A confirmation screen will appear
To edit details of the template
- Click the template name.