EasyForms / Setup
MAGIQ Documents Library and Folder Setup
For EasyForm documents to be saved into MAGIQ the library policies and folder properties must be setup as per below.
Library Policies
An explanation for each library policy can be found here.
If users are allowed to Edit EasyForm Documents, a 'Change Right' must be applied in the 'Users With' dropdown for 'Check out Documents'.
Library Manager Options can be altered accordingly depending on who will be the library manager.
Folder Properties
Document Check Outs and Document Check Ins must be allowed on the folder so that a document number can be applied to the service request form at time of creation.
Adding a Portal Icon
The portal administrator or system administrators are the people that can do the below.
The process below will allow EasyForms to open in a new tab.
- Within Control Panel – Portals.
- Highlight the relevant portal, ie Default.
- Click Go To Portal.
- Scroll to bottom of page.
- Click Design Mode.
- Choose Add New Gadget, select Static Box
- Enter the details as per below.
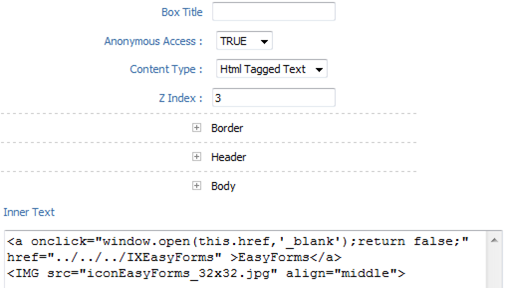
The inner text is:
<a onclick="window.open(this.href,'_blank');return false;" href="../../../IXEasyForms">EasyForms</a> <IMG src="iconEasyForms_32x32.jpg" align="middle">
Contact MAGIQ Documents and we will give you the icon (iconEasyForms_32x32.jpg).
- Select Border, Header and Body and adjust colours and fonts accordingly to match your existing icons.
Creating new HTML Form Templates
It is advised that you should have an understanding of HTML coding and the 'jquery' language.