Users and User Management / User Groups
User groups can be set to allow users of a similar nature to be grouped together. This simplifies the process of assigning security to folders and documents. Instead of selecting multiple individual users when assigning access, a single group can be selected instead.
There are three types of user groups
- Global User Groups.
- System User Groups (roles).
- Local User Groups.
Global user groups are defined at the system level and can be applied to or used in all libraries.
Local user groups are defined at the library level and can only be used in the library in which they are created.
Global user Groups
Creating a Global User Group
- Navigate to the MAGIQ Documents Control Panel.
- Choose Global User Groups
- Click New from the left sidebar.
- Enter a name for the user group.
- Check Public User Group if you want the members of the group to be visible to everyone. For example, displaying members display when creating/assigning a workflow or applying security to documents and folders.
- Click OK to create the new global user group.
Adding users to a Global User Group
To add users to the new group, highlight the group name from the list.
Note
Any users who are already members for a selected group will not appear in the Users list.
- Click Add Member from the left sidebar.
- Select the users you wish to add to this user group by clicking on the check boxes for each user.
- Click OK.
Removing users from a Global user Group
- Select the relevant group to expand.
- Click
 to the right of the users name.
 - Click OK.
Deleting a User Group
Note
The Group Members ability to access Libraries, Folders and Documents will be affected when deleting a group.
- Navigate to the "User Group" list (either in the "Global User Groups" area, or in the "Local User Groups" area for the library in question).
- Select the User Group you wish to delete from the "User Group" list.
- Click Delete located in the left sidebar.
- Click OK.
Local user Groups
Creating a Local User Group
- Navigate to the MAGIQ Documents Control Panel.
- Click Manage your libraries, users and user groups
- Select the library for which you wish to create a Local User Group.
- Click Local Groups
- Click New from the left sidebar.
- Enter a name for the new local user group.
- Check the "Private user group" checkbox if you wish to keep the members of this local user group private.
- Click OK to create the new local user group.
Adding users to a Local User Group
To add users to the new group, select the group name from the list.
- Click Add Member from the left sidebar.
- Select the users you wish to add to this user group by clicking on the check boxes for each user.
- Click OK.
Deleting a User Group
Note
The Group Members ability to access Libraries, Folders and Documents will be affected when deleting a group.
- Navigate to the "User Group" list (either in the "Global User Groups" area, or in the "Local User Groups" area for the library in question).
- Select the User Group you wish to delete from the "User Group" list.
- Click Delete located in the left sidebar.
- Click OK.
System User Groups
System user groups are defined at the system level by the System Administrator.
Members of system user groups are assigned special priveledges called "Roles" that allow members to perform functions usually reserved for the system administrator.
Administrators
By default the system administrator is applied to this group and cannot be removed. All users entered in this group have full rights to control panel.
Note
Only the System Administrator, members of the [administrators] system global user group and members of the [User Managers] system user group can create and manage global user groups.
Audit Managers
A user designated as an Audit Manager can access all audit logs in the system.
Policy Managers
A user designated as a Policy Manager can edit all Library policies.
R and D Manager
A user designated as an R & D Manager can sentence (dispose) documents. This user will receive task notifications when documents are ready for disposal.
If no users are specified, the task notification will go to the system administrator.
Note
If multiple users are entered, only one person will receive the task notification.
User Managers
A user designated as a User Manager can manage users, assign and remove users as members of groups.
Note
Only Administrators can manage the [Administrators],[Audit Managers], [Policy Managers] and [R&D Managers] groups.
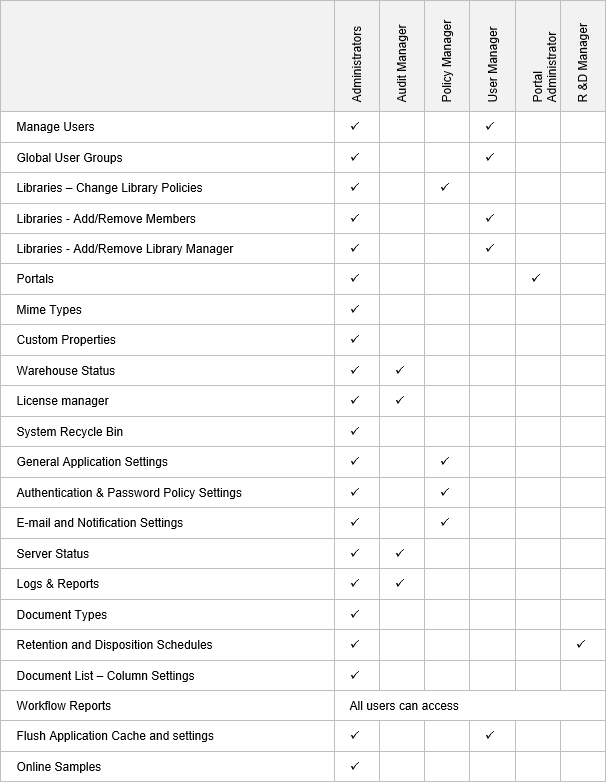
Members of the above groups can perform Sysadmin type actions from their normal login rather than using the System Administrator account - see table below. This is ideal for records managers.
Library Managers
Allows certain user to do additional functions to what a regular user would do.
Portal Administrators
Allow users to customise portals.
For more information on portals, refer to portals.
Search & Category Administrators
Can create and modify custom saved search screens and custom categories.
Custom saved search screens enable Users to perform a search quickly instead of using the Advanced Search screen which contains all possible search scope selections.
Categories are pre-defined searches. They differ from saved searches in that, categories do not require or allow user input.
For more information on createing search pages or categories, refer to Search pages and categories
To identify which role has access to which control panel function